
Digiwatch Manual
Digiwatch is a small Windows executable (250 KB) that can mimic any digital watch as a desktop widget. It is composed of
- a rich-text editor/debugger of .digi scripts
- a loader (main dialog)
- a widget engine
- and an admin-box
Table of content
- Installation
- Run/install a widget
- Create/edit a widget
- Example: Light mode
- Example: World Time modes
- Example: Alarm mode
- Example: Stopwatch mode
- Example: Countdown timer mode
- Admin Box and Debug
Installation
You can download Digiwatch from http://mougino.free.fr/digiwatch/download.html
Unzip the digiwatch.zip somewhere on your computer in a dedicated folder,
then you just need to double-click digiwatch.exe to open the Digiwatch loader (main dialog).

At first launch, you will be asked if you want to register the .digi extension.
This allows you to launch a widget just by double-clicking its .digi script.
To register the extension, you may have to run digiwatch.exe as an administrator (right-click on it > run as admin).

Run/install a widget
By default the Digiwatch zip contains a widget called "demo". It contains an animated watch with date and time, the Citizen Ana-Digi Temp
To run a widget, either double-click digiwatch.exe then double-click the widget name in the Loader ;
or if you have registered the .digi extension, double-click on the widget.digi itself directly from the Windows explorer.

To install other watches: download their zip from http://mougino.free.fr/digiwatch/ and unzip in your Digiwatch local folder.
Then run digiwatch.exe and double-click on the watch of your choice in the Loader to run it.
Widget options
Right-click a widget to open its options menu:

Select "About Digi Watch" to learn about the different options. Some interesting options include: start the widget with Windows, or create a shortcut to the widget anywhere on your computer.
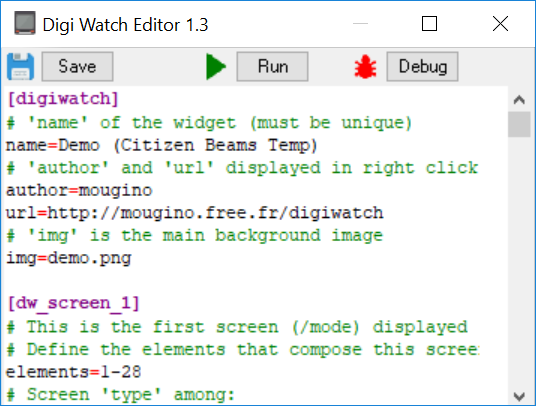
Create/edit a widget
A Digi Watch widget is simply a text script with a .digi extension being parsed by the Digiwatch widget engine.
A .digi file can be opened for modification in the built-in Editor, or in any other one like Notepad++. Its syntax is similar to the Windows .ini configuration files:
[section1]
property1=value1
property2=value2
...
Cheat Sheet
| Property | In section | Value | Does what | Link for more detail |
|---|---|---|---|---|
name |
[digiwatch] |
=My Widget |
Unique identifier | Digiwatch section |
author |
[digiwatch] |
=My Name |
Displayed in 'About this widget' | Digiwatch section |
url |
[digiwatch] |
=http://mywebsite.com |
Displayed in 'About this widget' | Digiwatch section |
img |
[digiwatch] |
=localpic.png |
Watch main background image | Digiwatch section |
w(1 to 7) |
[dw_days] |
=Mon |
Short week days | Weekdays and month names |
wd(1 to 7) |
[dw_days] |
=Monday |
Long week days | Weekdays and month names |
M(1 to 12) |
[dw_months] |
=JAN |
Short month names | Weekdays and month names |
MM(1 to 12) |
[dw_months] |
=January |
Long month names | Weekdays and month names |
+1 |
[timezones] |
=PAR |
Time Zone name | Timezones |
-5 |
[timezones] |
=NYC |
Time Zone name | Timezones |
local |
[timezones] |
=-5 |
Local Time Zone | Timezones |
fav |
[timezones] |
=+1,+8,+10,-8 |
Favorite Time Zones | Timezones |
anchorage |
[dw_element_1] |
=10,90 |
X,Y position of element in pixels | Elements position |
x-align |
[dw_element_1] |
=left =middle =right |
Horizontal aligment of element | Elements position |
y-align |
[dw_element_1] |
=top =middle =bottom |
Vertical alignement of element | Elements position |
img |
[dw_element_1] |
=localpic.png |
The img element picture filename | Image elements |
text |
[dw_element_1] |
=H:mn.s =\protected |
The text element string including special keywords | Text elements |
font |
[dw_element_1] |
=Arial Black |
The text element font | Text elements |
fontsize |
[dw_element_1] |
=50px |
The text element height in pixels | Text elements |
color |
[dw_element_1] |
=#112233 |
The text element hexadecimal RGB color | Text elements |
frequency |
[dw_element_1] |
=300ms =2s |
The element animation frequency | Elements animation |
animation |
[dw_element_1] |
=0011000111 |
The element animation frames (0=hide 1=show) | Elements animation |
visible |
[dw_element_1] |
=3s =AM/PM =alarm_on/off =tz-5 |
The element visibility condition | Elements visibility |
name |
[dw_button_1] |
=Adjust |
Button name/tooltip | Buttons |
rect-topleft |
[dw_button_1] |
=10,90 |
Rectangular button X,Y top-left position in pixels | Buttons |
rect-size |
[dw_button_1] |
=40,20 |
Rectangular button width & height in pixels | Buttons |
circle-center |
[dw_button_1] |
=10,90 |
Circular button X,Y center in pixels | Buttons |
circle-radius |
[dw_button_1] |
=20 |
Circular button radius in pixels | Buttons |
name |
[dw_screen_1] |
=World Time |
Optional name for the screen | Screens |
elements |
[dw_screen_1] |
=1-4,9-12 |
Elements identifiers composing the screen | Screens |
button-1-action |
[dw_screen_1] |
=dw_screen_.. =dw_element_.. |
Action for a given button in the scope of this screen | Button actions |
button-1-action |
[dw_screen_1] |
=worldtime_.. =alarm_.. |
Action for a given button in the scope of this screen | Button actions |
button-1-action |
[dw_screen_1] |
=chrono_.. =countdown_.. |
Action for a given button in the scope of this screen | Button actions |
Digiwatch section
To create a new Digi Watch, start with the mandatory [digiwatch] section and fill the widget name, author, and url.
Then add the main watch background image as the img property. The image must be stored in the same folder as digiwatch.exe
[digiwatch]
; 'name' of the widget (must be unique)
name=Demo (Citizen Beams Temp)
; 'author' and 'url' displayed in right click > About this widget
author=mougino
url=http://mougino.free.fr/digiwatch
; 'img' is the main background image
img=demo.png
Weekdays and month names
You can customize the week days (Monday, Tuesday..) and the month names (January, February..) to your liking with the following sections:
[dw_days]
; Here define the day names:
; Short:
w(1)=Mon
w(2)=Tue
w(3)=Wed
w(4)=Thu
w(5)=Fri
w(6)=Sat
w(7)=Sun
; Long:
wd(1)=Monday
wd(2)=Tuesday
wd(3)=Wednesday
wd(4)=Thursday
wd(5)=Friday
wd(6)=Saturday
wd(7)=Sunday
[dw_months]
; Here define the month names:
; Short:
M(1)=JAN
M(2)=FEB
M(3)=MAR
M(4)=APR
M(5)=MAY
M(6)=JUN
M(7)=JUL
M(8)=AUG
M(9)=SEP
M(10)=OCT
M(11)=NOV
M(12)=DEC
; Long:
MM(1)=January
MM(2)=February
MM(3)=March
MM(4)=April
MM(5)=May
MM(6)=June
MM(7)=July
MM(8)=August
MM(9)=September
MM(10)=October
MM(11)=November
MM(12)=December
Timezones

If your Digi Watch allows to show time in different cities, you can define the time zone names in the [timezones] section:
[timezones]
; Time zone names:
0=LON
+1=PAR
+2=ATH
+3=JED
+4=DXB
+5.5=DEL
+6=DAC
+7=BKK
+8=HKG
+9=TYO
+10=SYD
+11=NOU
+12=WLG
+13=TBU
+14=CXI
-12=BAR
-11=PPG
-10=HNL
-9=ANC
-8=LAX
-7=DEN
-6=CHI
-5=NYC
-4=SCL
-3=RIO
-2=FEN
-1=RAI
[timezones]
; Time zone names:
+3.5=TEH
+5.75=KAT
local time zone:
[timezones]
; My local time zone:
local=+1
; Time zone names:
0=LON
+1=PAR
+2=ATH
...
[timezones]
; My favorite time zones:
fav=+8,+10,-8,-5
; My local time zone:
local=+1
; Time zone names:
0=LON
+1=PAR
+2=ATH
...
Elements
Elements are the smallest component of a Digi Watch: they can be either a text (day of week, time, date...) or an img (image = subdial, blinking LCD icon, etc.)
Elements are sections of the .digi script named [dw_element_1] up to [dw_element_n]...
Elements position
Any element, may it be a text or an img needs to have a position property defined as anchorage.
The anchorage is a X,Y position in pixels defining where to place the element. In the images below, anchorages appear as yellow square dots.
Along with the two (optional) properties x-align and y-align, they will define how to position the element (red rectangle box) on the background image.
| x-align values | y-align values | ||
|---|---|---|---|
| left (default) |
|
top (default) |
|
| middle |
|
middle |
|
| right |
|
bottom |
|


Example:

There are four elements in the watch above. Each have an anchorage in yellow and an x/y-align in red:
[dw_element_1]for the week day (text=wd) positioned at 294,188 with respectivey-alignandx-alignproperties set tobottom&right> BR[dw_element_2]for the date in the formattext=d-Mpositioned at 77,226 with respectivey-alignandx-alignproperties set tobottom&left(default) > BL[dw_element_3]for the week number prefixed with the letter 'W' (text=Wwn) positioned at 294,232 with respectivey-alignandx-alignproperties set totop(default) &right> TR[dw_element_4]for the time in the formattext=H:mn.spositioned at 98,268 with respectivey-alignandx-alignproperties set totop(default) &left(default) > TL
Image elements
img (image) elements are typically used to show subdials, icons such as alarm on/off, etc.
An img element has the following property that can be defined:
img= the image file
E.g. img=demo.png if "demo.png" is placed near digiwatch.exe ; or img=demo\a1_1.png if "a1_1.png" is placed in a subfolder called "demo" from the digiwatch.exe folder.
No other property is needed for images (appart from the mandatory anchorage property of course).
Text elements
text elements are typically used to show the time, date, week etc.
A text element has the following properties that can be defined:
text= the text value itself
The text is parsed against the following keywords (careful, keywords are case-sensitive: 'H' <> 'h'):
| Keyword | Replaced by |
|---|---|
| h | current time short hour (1 or 2 digits) on 12 hours |
| hh | current time long hour (2 digits, prefixed with '0') on 12 hours |
| H | current time short hour (1 or 2 digits) on 24 hours |
| HH | current time long hour (2 digits, prefixed with '0') on 24 hours |
| mn | current time minutes (2 digits, prefixed with '0') |
| s | current time seconds (2 digits, prefixed with '0') |
| w | short weekday name (see next section) |
| wd | full weekday name (see next section) |
| wn | week number |
| d | short day number (1 or 2 digits) |
| dd | long day number (2 digits, prefixed with '0') |
| m | short month number (1 or 2 digits) |
| mm | long month number (2 digits, prefixed with '0') |
| M | short month name (3 characters) e.g. JAN, FEB, MAR... |
| MM | long month name e.g. January, February... |
| yy | short year number (2 digits) |
| yyyy | long year number (4 digits) |

| Keyword | Replaced by |
|---|---|
| tz | time zone name |
| wh | world time short hour (1 or 2 digits) on 12 hours |
| whh | world time long hour (2 digits, prefixed with '0') on 12 hours |
| WH | world time short hour (1 or 2 digits) on 24 hours |
| WHH | world time long hour (2 digits, prefixed with '0') on 24 hours |
| wmn | world time minutes (2 digits, prefixed with '0') |
| ah | alarm short hour (1 or 2 digits) on 12 hours |
| ahh | alarm long hour (2 digits, prefixed with '0') on 12 hours |
| AH | alarm short hour (1 or 2 digits) on 24 hours |
| AHH | alarm long hour (2 digits, prefixed with '0') on 24 hours |
| amn | alarm minutes (2 digits, prefixed with '0') |
| ch | chrono/countdown hour (1 or 2 digits) |
| cmn | chrono/countdown minutes (2 digits, prefixed with '0') |
| cs | chrono/countdown seconds (2 digits, prefixed with '0') |
| cms | chrono/countdown tens of milliseconds (2 digits, prefixed with '0') |
E.g. text=H:mn.s will display 13:54.19 (or whatever the local time is), in military format.
To protect a text from being parsed, start it with a backslash: text=\h:mn will display "h:mn" and not "1:23" or whatever the time is.
font= the font for the text
The font file (TTF, OTF...) must be placed in the same folder as digiwatch.exe.
To know the exact name of the font to be called, double-click the TTF file in Windows and look at the font name:

fontsize= the height of the text, in pixels. E.g below:
[dw_element_1]
text=H:mn
fontsize=54px

coloris the text RGB color value in hexadecimal, prefixed with#
E.g. #FF0000 = pure red ; #00FF00 = pure green ; #0000FF = pure blue ; etc.
Elements animation
An element, may it be a text or an img is static by default, but it can be animated!
This is particularly useful when you want to do a blinking element (like the semicolon between the hour and minutes for example).
If you want to animate an element, there are two properties that need to be defined:
- The
frequencyin milli-seconds, or in seconds e.g.frequency=300msorfrequency=2s - The
animation: a string composed of '0' and '1' for respectively hidden frames and displayed frames
Minimum frequency is 100ms. Maximum frequency is 5s.
To do a simple blinking semicolon between hour and minutes for example:
[dw_element_3]
text=:
; 'frequency' of the animation e.g. 100ms ; 2s etc.
frequency=500ms
; 'animation' frames (played in loop), composed of '0' (hide) and '1' (show)
animation=01
Elements visibility
You can trigger the visibility of an element based on certain properties of the current watch mode (screen type):
visible=3swill show the element for 3 seconds. This can be useful to simulate pressing a light buttonvisible=AMwill only show the element between midnight and noon (AM = Ante Meridiem = morning)visible=PMwill only show the element between noon and midnight (PM = Post Meridiem = afternoon)visible=alarm_onwill only show the element when the alarm is activatedvisible=alarm_offwill only show the element when the alarm is disabledvisible=tz+1will only show the element when the current time zone value is+1(GMT plus 1 hour)visible=tz-2.5will only show the element when the current time zone value is-2.5(GMT minus 2 hours 30 mn) etc.
Buttons
You can define zones on your watch that will act as buttons: when the user clicks them, they will trigger actions that you have defined in each screen.
A button is defined as [dw_button_1] to [dw_button_n] and has the following properties that need to be defined:
name=..e.g.name=Modename=Setname=Light= the name of the function button
This name will appear in a tooltip when hovering over the button zone.
And either:
rect-topleft=x,yfollowed by:rect-size=w,h
to define a rectangular zone starting at top-left coordinates x,y and of width/height w,h
-or-
circle-center=x,yfollowed by:circle-radius=r
to define a circular zone centered on the x,y coordinates and of radius r pixels.
Example:

[dw_button_1]
name=Light
rect-topleft=5,58
rect-size=18,40

[dw_button_2]
name=Set
circle-center=300,78
circle-radius=9

[dw_button_3]
name=Mode
circle-center=20,200
circle-radius=20

[dw_button_4]
name=Change
rect-topleft=292,187
rect-size=13,24
Screens
Screens regroup a set of elements and allow certain types of actions/displays.
They are defined by [dw_screen_1] to [dw_screen_n].
At least 1 (one) screen must be defined to display a widget.
Screens have the following properties that need to be defined:
nameis an optional name to help debug
* elements is the list of elements displayed for this screen, separated by comas, e.g. elements=1,2,3
You can also define a range of elements e.g. to display dw_element_2 up to dw_element_5 included, use: elements=2-5
You can combine different elements/ranges: e.g. elements=1-3,8-12,20-25
button-n-action(optional) are button actions for this screen
Button actions
Button actions are defined in the scope of a given screen.
If you have the same action for several screens, you need to copy the button-n-action property in each [dw_screen_n] section...
Here is the accepted list of values for button actions:
| button-n-action | What it does |
|---|---|
=dw_screen_n |
Navigate between screens |
=dw_element_n |
Add a single element to the screen |
=worldtime_all_next |
Increment the index of All Time Zones |
=worldtime_all_prev |
Decrement the index of All Time Zones |
=worldtime_fav_next |
Increment the index of Favorite Time Zones |
=worldtime_fav_prev |
Decrement the index of Favorite Time Zones |
=alarm_onoff |
Activate/deactivate the daily alarm |
=alarm_set |
Open dialog to set the daily alarm time |
=chrono_startstop |
Start/stop the stopwatch aka chrono |
=chrono_reset |
Reset the chrono |
=countdown_set |
Open dialog to set the countdown timer |
=countdown_startstop |
Start/stop the countdown timer |
=countdown_reset |
Reset the countdown timer |
Navigate between screens
To navigate between screens, you need to have several [dw_screen_n] defined (of course) and
at least 1 [dw_button_1] to define a button action.
Then in the [dw_screen_X] section, define an action property button-1-action of value dw_screen_Y: e.g.
[dw_screen_1]
name=Timekeeping Mode
button-1-action=dw_screen_2
Here is an example of an action chart to navigate between screens:

Example: Light mode
Digiwatch allows you to add a single element [dw_element_n] to the screen by pressing a button.
The typical example is pressing the Light button:
you will add a semi-transparent picture on top of the current screen that will disappear after a few seconds.
This can be done with the following script:
[dw_element_99]
img=demo\light.png
anchorage=0,0
visible=3s

[dw_button_2]
name=Light
rect-topleft=205,18
rect-size=20,40

[dw_screen_1]
elements=1-10
button-2-action=dw_element_99
Example: World Time modes
World Time lets you look up the current time in any city around the globe, based on its time zone = its time difference with the UTC (Universal Coordinated Time) aka GMT (Greenwich Meridian Time).
To set the different time zones and city names, please refer to the Timezones section.
You can implement up to 2 (two) distinct World Time modes: showing All time zones and/or only your Favorite time zones.
Here is a script example how to display a World Time screen:
[dw_screen_1]
name=World Time
elements=1,2

[dw_element_1]
; WT hr:mn.sec
text=WH:wmn.s
fontsize=40px
anchorage=0,50

[dw_element_2]
; WT city name
text=tz
anchorage=0,0
This is an example of how to do it:

[dw_button_2]
name=Prev TZ
circle-center=180,20
circle-radius=20

[dw_button_4]
name=Next TZ
circle-center=180,80
circle-radius=20

[dw_screen_1]
name=World Time
elements=1,2
button-2-action=worldtime_all_prev
button-4-action=worldtime_all_next

[dw_element_1]
; WT hr:mn.sec
text=WH:wmn.s
fontsize=40px
anchorage=0,50

[dw_element_2]
; WT city name
text=tz
anchorage=0,0
[dw_screen_1]
button-2-action=worldtime_all_prev
button-4-action=worldtime_all_next
[dw_screen_1]
button-2-action=worldtime_fav_prev
button-4-action=worldtime_fav_next
Example: Alarm mode
You can set a daily alarm at a time (hour:minute) specified by you.
The alarm will trigger when the current local time reaches the alarm time.
Here is a script example how to display an alarm setting screen:
[dw_screen_1]
name=Alarm
elements=1,2

[dw_element_1]
; Alarm hr:mn
text=AH:amn
fontsize=40px
anchorage=0,0

[dw_element_2]
; Alarm state icon
img=demo\alarmico.png
anchorage=110,60
visible=alarm_on
This is an example of how to do it:

[dw_button_1]
name=Set
circle-center=20,20
circle-radius=20

[dw_button_4]
name=On/Off
circle-center=180,80
circle-radius=20

[dw_screen_1]
name=Alarm
elements=1,2
button-1-action=alarm_set
button-4-action=alarm_onoff

[dw_element_1]
; Alarm hr:mn
text=AH:amn
fontsize=40px
anchorage=0,0

[dw_element_2]
; Alarm state icon
img=demo\alarmico.png
anchorage=110,60
visible=alarm_on
Example: Stopwatch mode
The stopwatch aka chrono can measure elapsed time up to 23 hours, 59 minutes, 59 seconds (24 hours).
The chrono hour, minute, second and tens-of-millisecond values can be accessed
through the respective text keywords: ch, cmn, cs and cms
Here is a script example how to display a chrono:
[dw_screen_1]
name=Stopwatch
elements=1,2

[dw_element_1]
; Chrono hr:mn.sec
text=ch:cmn.cs
fontsize=40px
anchorage=0,0

[dw_element_2]
; Chrono tens-of-milliseconds
text=cms
fontsize=20px
anchorage=100,20
This is an example of how to do it:

[dw_button_1]
name=Reset
circle-center=20,20
circle-radius=20

[dw_button_4]
name=Start/Stop
circle-center=180,80
circle-radius=20

[dw_screen_1]
name=Stopwatch
elements=1,2
button-1-action=chrono_reset
button-4-action=chrono_startstop

[dw_element_1]
; Chrono hr:mn.sec
text=ch:cmn.cs
fontsize=40px
anchorage=0,0

[dw_element_2]
; Chrono tens-of-milliseconds
text=cms
fontsize=20px
anchorage=100,20
Example: Countdown timer mode
The countdown timer counts down from a start time specified by you. It is very similar to the stopwatch/chrono in its programming, the only difference is that you can set a start time.
The countdown timer hour, minute, second and tens-of-millisecond values can be accessed
through the respective text keywords: ch, cmn, cs and cms (same as the chrono).
Here is a script example how to display a countdown timer:
[dw_screen_1]
name=Countdown
elements=1,2

[dw_element_1]
; Countdown hr:mn.sec
text=ch:cmn.cs
fontsize=40px
anchorage=0,0

[dw_element_2]
; Countdown tens-of-milliseconds
text=cms
fontsize=20px
anchorage=100,20
This is an example of how to do it:

[dw_button_1]
name=Reset
circle-center=20,20
circle-radius=20

[dw_button_2]
name=Set
circle-center=180,20
circle-radius=20

[dw_button_4]
name=Start/Stop
circle-center=180,80
circle-radius=20

[dw_screen_1]
name=Countdown
elements=1,2
button-1-action=countdown_reset
button-2-action=countdown_set
button-4-action=countdown_startstop

[dw_element_1]
; Countdown hr:mn.sec
text=ch:cmn.cs
fontsize=40px
anchorage=0,0

[dw_element_2]
; Countdown tens-of-milliseconds
text=cms
fontsize=20px
anchorage=100,20
Admin Box and Debug
When your widget is already running, and you run a second instance of the same widget
(through the loader, or by drag-n-dropping a .digi on digiwatch.exe, or by double-clicking
a .digi file if you have registered the .digi extension) it will open an Admin Box:

The first button allows you to kill the widget. This can be useful if the widget is not responding, or if it is out of the screen.
The second button will reset all settings for the widget, re-centering it on (the main) screen.
The third option (checkbox) activates the debug mode.
In debug mode, the elements anchorage and bounding box are displayed on the widget respectively with a yellow square and with a red rectangle:
In debug mode, an XML log file with all operations is also created in the folder containing digiwatch.exe.
You can read it to see very useful debug information. This is a must if you create a script and you do
not see the expected results on screen for example.
To deactivate the debug mode, run again a second instance of the same widget, and uncheck the third option checkbox.