|
|
RFO-BASIC!
App Builder Howto + FAQ
|
Howto – Beginner’s instructions 4
The goal of this document is to allow you to get the best from the RFO-BASIC! App Builder. While the user interface of the App Builder is pretty straightforward, some tips explained here will allow you to build your BASIC! program into the perfect APK*, that will behave like expected and run correctly on the Android platforms you are targeting.
* APK stands for Android Package, it is the standardized format of the Android applications
First, and it is important to stress it, you need to use RFO-BASIC! App Builder after you have fully written and tested your application in BASIC! on your Android device. Only when you are sure your application is complete, stable, and with no bugs can you transform it to a final APK with App Builder.
In other words, App Builder is the last step in the process of making an application. Do not use it to debug your program as it is impossible to debug a final APK (if there is an error it will crash without a warning). On the opposite, the BASIC! environment provides a lot of debugging options and is error-friendly (it will tell you what is wrong, at which line, making it easy to find and fix errors).

Finally,
each project folder should contain at least a /source
subfolder containing the BASIC! program itself (*.bas).
If
your program uses resources, you should create a /data
subfolder as well, next to the /source
one. And finally create a /databases
subfolder next to /source
and /data
if your program makes use of SQLITE databases. See some examples in
the sum-up picture below:
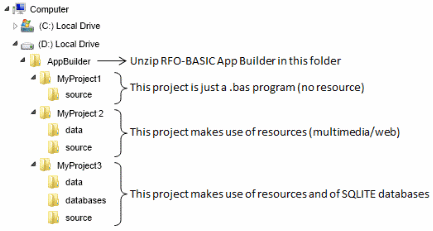
Projects’ subfolder-architecture (source/data/databases) is exactly the same as on your Android device:
<base folder> /rfo-basic /source contains the BASIC! program itself (*.bas)
<base folder> /rfo-basic /data contains the resources needed by your program
<base folder> /rfo-basic /databases contains the SQLITE databases used by your program
After creating each subfolder on your computer, you need to copy all files needed by your program to them. Another way to look at it: you can copy the whole "rfo-basic" folder and all its content from your Android cellphone or tablet to the App Builder folder, then rename it from "rfo-basic" to the name of your project. Finally, remove any unwanted files (not needed by your program) from the /source, /data and /databases project subfolders.
Now you are ready to launch RFO-BASIC! App Builder…
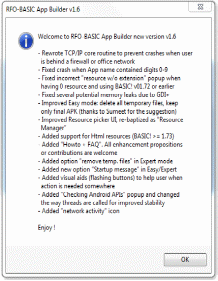
When you launch App Builder for the first time, several windows can appear, depending on the situation: if you just upgraded from an earlier version of App Builder, a list of the functionalities implemented in the newer version (aka the changelog) will appear. After you dismiss the changelog (or at a future launch) the Guide window may be displayed. As its name indicates, it will guide you in downloading and setting-up some tools needed by App Builder.
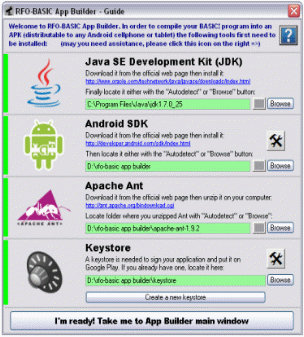
For details on the Guide see the dedicated section below in this document.
After all the tools in the Guide have been correctly set (=green), you can click the large "I’m ready" button at the bottom of the window, you will then arrive in the main interface of RFO-BASIC! App Builder:
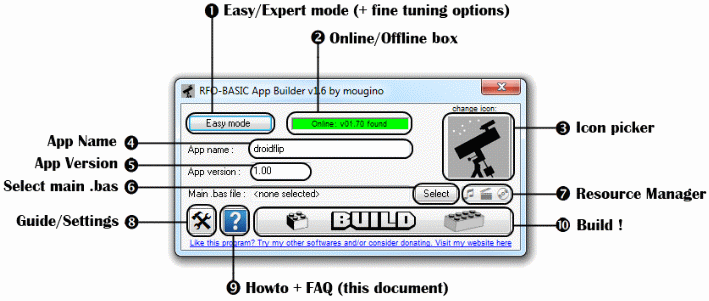
If you are a beginner we suggest that you keep using "Easy mode" (set by default in button Œ), also you should use App Builder while plugged on the internet: the program will connect to RFO-BASIC! website, detect the latest version of BASIC! and use it to build your APK (this is the "Online" mode, the box is green).
Then, as a beginner, all you have to do, if you followed the previous steps (i.e. you prepared your folders) is to type an App name in the field , you can also type a version number in the field or leave it as is, then click the "Select" button in ‘ to select your main .bas file from the /source project subfolder on your computer.
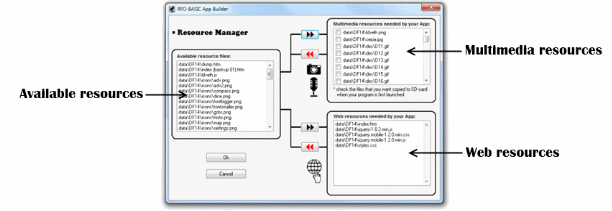
App Builder will read your program and detect if it uses resource and/or databases (according to the presence of "OPEN" or "LOAD" type commands). If it is the case, the Resource Manager will be launched. You can also access the Resource Manager from the button ’ of App Builder main interface. The Resource Manager window looks like this:
The
box on the left contains the available
resources,
found in your /data
and /databases
project subfolders.
Select
an available
resource
(click on its name in the box), then if your program uses it as a
multimedia
resource
(opened with BASIC! command BYTE.OPEN,
TEXT.OPEN,
GR.BITMAP.LOAD,
AUDIO.LOAD,
or SOUNDPOOL.LOAD),
transfer it with the first "8"
button to the upper-right "Multimedia
resources"
box. Or if your program uses the file as a web
resource
(i.e. it is an Html opened with BASIC! command HTML.LOAD.URL
or an image used by a local Html), transfer it with the second "8"
button to the lower-right "Web
resources"
box.
If you made a mistake you can put a resource transferred to the right back to the "Available resources" box by using one of the "7" buttons after selecting (clicking) the name of the resource. In all 3 boxes, you can select multiple resources by maintaining the Ctrl key pressed and clicking several resource names. You can also select a contiguous list of resources by clicking on the name of the first one, maintaining the Shift key pressed, then clicking on the name of the last one.
When you have finished moving the resources to the good boxes, click the "Ok" button. Back to App Builder main interface, click the large "Build" button in • to build your APK! It will be produced in a matter of seconds in your project folder, which will be opened at the end of the process.
Beginners should always use the "Easy mode". However, advanced users or even Android experts can have access to very interesting options by switching to "Expert mode":
T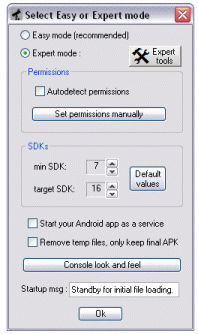 he
usual expert options, in the window on the left, allow you to change
values mostly present in the AndroidManifest.xml
that will have an impact on how your APK installs or behaves in
Android devices. Such options are: set the permissions manually,
choose the min SDK and target SDK values, start your app as a service
(i.e. launch it automatically when the Android device is booting),
change the startup message, and change the console look and feel:
font size and type, screen orientation, background and font colors,
lines or no lines.
When
switching to "Expert mode" you also have the choice to
remove the "temporary files" created and used by App
Builder to compile your program to an APK (identical behaviour as in
"Easy mode"), however, the true power of the "Expert
mode" comes when keeping these "temporary files" (in
fact, they are a full Android project, Ant/Eclipse-compatible) i.e.
uncheck
the option "Remove temp files, only keep final APK". Acting
this way to build your APK, you will create an Android project at the
same level as the /source,
/data
and /databases
project subfolders, that you can later modify. Here enters the very
interesting
![]() button!
button!
In
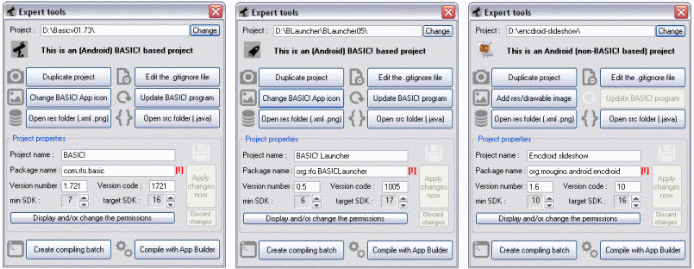
the 3 windows above, you can see 3 actual Android projects opened
with App Builder's
![]() : respectively
RFO-BASIC! itself (v01.73), a project derived from RFO-BASIC! (BASIC!
Launcher), and finally a non-BASIC! 100% Android Java project. Each
window is divided into 3 blocks: a block of 6 buttons, then a block
entitled "Project properties" containing different fields,
and finally a block of 2 buttons dedicated to compiling (building)
the project to an APK.
: respectively
RFO-BASIC! itself (v01.73), a project derived from RFO-BASIC! (BASIC!
Launcher), and finally a non-BASIC! 100% Android Java project. Each
window is divided into 3 blocks: a block of 6 buttons, then a block
entitled "Project properties" containing different fields,
and finally a block of 2 buttons dedicated to compiling (building)
the project to an APK.
Altogether these tools allow you to duplicate and/or modify existing Android projects. It is the perfect set of tools to operate versioning of an existing app, that you put on Google Play for example: just open project, duplicate, accept opening the duplicated project when you are prompted, then change the version number and version code, open the src folder and change some .java files (or in case of a BASIC! based project, update your BASIC! program) and finally compile with App Builder (you will be asked with what keystore)... In a few clicks you can do very automated and powerful operations, release a v0.2 from a v0.1 project is a matter of minutes!
For those who want even more control, the already existing compiling batch system "BuildAPK.bat" has been improved and integrated in the Expert tools: more secured, integrated to github (try removing your existing .gitignore file before loading your project in the Expert tools, then create a very complete one with the dedicated button), the compiling batch contains the same power as App Builder but outside App Builder! You can modify the batch or redirect its output as wanted for a 100% masterized transparent compiling.
Between the "Easy/Expert mode" button and the large "icon" button is the "Online/Offline" box. The existence of this box is due to the following: in order to build your program into an APK, App Builder needs a full RFO-BASIC! archive (.zip file). This archive can be directly and transparently downloaded from Paul LAUGHTON's website (online mode) or can be located on a local drive (offline mode). Beginners should always use "Online mode" as proposed by App Builder by default.
When you put your mouse over the "Online/Offline" box, the cursor changes to a "hand", meaning you can do a simple left-click. Doing so opens a contextual menu, the content of which depends on the state of the box. All in all the "Online/Offline" box can be of 4 different states, meaning 4 different colors:
![]() means
App Builder is trying to reach the official RFO-BASIC! website to see
if the most recent archive can be downloaded.
means
App Builder is trying to reach the official RFO-BASIC! website to see
if the most recent archive can be downloaded.
![]() means
App Builder managed to connect to internet and has found a suitable
BASIC! archive to download and work on.
means
App Builder managed to connect to internet and has found a suitable
BASIC! archive to download and work on.
![]() means
App Builder couldn't find any online archive, either because the
computer is not connected to internet or the official website is
temporarily unavailable. You need to open the contextual menu then
you can try switching to online mode again, or choosing a local
RFO-BASIC! zip.
means
App Builder couldn't find any online archive, either because the
computer is not connected to internet or the official website is
temporarily unavailable. You need to open the contextual menu then
you can try switching to online mode again, or choosing a local
RFO-BASIC! zip.
![]() means
an offline usage of App Builder: a correct (but maybe not the most
recent) archive of BASIC! has been selected from a local drive and
can be used to build your BASIC! program into an APK.
means
an offline usage of App Builder: a correct (but maybe not the most
recent) archive of BASIC! has been selected from a local drive and
can be used to build your BASIC! program into an APK.
Additionaly, when left-clicking on the box and deciding to switch to online mode (when offline) or to offline mode (when online), App Builder will ask you if it must go to this new mode by default. This is particularly useful if you are always using App Builder in offline mode (your computer is not connected to internet) and you don't want App Builder to look for newer BASIC! archive at startup, for example.
Android apps (hence your APK) posess an icon, declined in 3 or more different sizes in order to target different menus or screen resolutions (tablets, small-screen phones, phablets, etc.) The sizes are: low-resolution aka ldpi ("dpi" means dot-per-inch), medium-resolution aka mdpi, high resolution aka hdpi, and even for non-BASIC! projects extra-high resolution aka xhdpi. When modifying the visual identity of your app by changing its icon, you would normally need to manually resize the original icon into 3 or more PNGs of different sizes in different folders... fastidious!
App Builder automates this process with the help of the large "icon" button in the up-right corner. When moving your mouse over this button, the cursor changes to a "hand" meaning you can do a simple left-click. Also a balloon tip appears as a helper. Click on the icon button to open a file selecter, then choose a square image (width = height, this is important) you can select a PNG with transparency to have better looking results. The image formats supported are:
Windows Bitmap (*.bmp), Windows Icon (*.ico), Portable Network Graphic (*.png), JPeg (*.jpg, *.jif), Graphics Interchange Format (*.gif), Tagged Image File Format (*.tif), Kodak Photo CD (*.pcd), PC Paintbrush (*.pcx), Dr. Halo (*.cut), Interchange File (*.iff), Portable Bitmap (*.pbm), Portable Graymap (*.pgm), Portable Pixelmap (*.ppm), Sun Raster (*.ras), Targa (*.tga), JPEG Network Graphics (*.jng), IFF Interleaved Bitmap (*.lbm), Multiple-image Network Graphics (*.mng), Photoshop Document (*.psd), High Dynamic Range image (*.hdr), Wireless Bitmap (*.wbmp), X Pixmap (*.xpm).
For better looking results it is recommended to select an original image of at least 72x72 pixels (= hdpi resolution). Not doing that, the hdpi icon for your app may look blurry because of the upscaling.
Before you can build your BASIC! program to an APK, a total of 4 tools, in addition to App Builder itself, need to be installed on your computer. The Guide window that opens at the very first launch of App Builder assists you in downloading and installing these 4 tools, namely:
T he
Java
Standard Edition Development Kit
(aka JDK)
is a well-known solution owned by Oracle and allowing to develop and
deploy Java applications to desktops, servers, or embedded devices
(including Android phones).
At
the time of writing this documentation, the latest version of the JDK
to be downloaded and installed on your system is Java
SE 7u25.
Anyway,
always
chose the most recent version.
Also,
we
recommend to leave
the default installation folder "as is"
(i.e. C:\Program
Files\Java\
or similar) thus after installation App Builder's autodetect button
(![]() )
will
be able to
find the JDK
on your system.
)
will
be able to
find the JDK
on your system.

The Android Software Development Kit (Android SDK) is the most important tool needed.
Several important points: (to be read, even by beginners)
1) Only the lightest version of Android SDK, without Eclipse, is needed: when on the official download page, don't click on the big blue button "ADT Bundle", but rather go at the bottom of the page > USE AN EXISTING IDE > Download the SDK Tools
2) We recommend to choose a local "non-system" installation folder. Using a "system" folder such as C:\Program Files\... or C:\Windows\... will complicate things as you will need, in order to launch the SDK Manager, to open said folder and right-click > "Run as admin" on a certain .bat file (instead of just pressing a button in App Builder!)
3)
The perfect folder to install the Android SDK is simply the App
Builder folder.
Thus, after installation, App Builder's autodetect button (![]() )
will find the SDK directly.
)
will find the SDK directly.
4)
After installation, you need to open the SDK
Manager
and install several components. To
open it,
click App
Builder's
"Configuration" button (![]() )
in the Android
SDK section,
then the big button with the "Android SDK" logo.
)
in the Android
SDK section,
then the big button with the "Android SDK" logo.
5) When in the SDK Manager the minimum components to be installed from internet are:
- the 3 sets of tools: "Android SDK Tools", "SDK Platform-tools" and "SDK Build-tools"
- the most recent "SDK platform" and depending on which platform you target, either the "ARM EABI" or "Intel x86" or "MIPS" System Image(s), see below:
V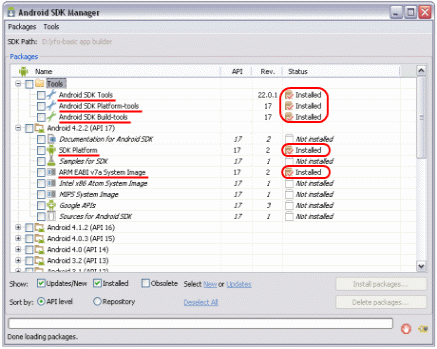 ery
important:
only the most
recent Android API's
SDK Platform and System Image (=in the screenshot above: API 17 for
Android 4.2.2) need to be installed! Even if you plan to target very
old versions of Android such as Eclair or Froyo. Even if you want to
compile a same app for different Android versions (e.g. 1 for API 17,
then 1 for API 16, then 1 for API 13). The Android SDK is
retro-compatible
or as we say in French: "qui peut le plus peut le moins"
(who can do more can do less), which means that choosing the highest
most recent API can allow you to target all the previous older APIs
if you wish so (such tuning is done with the Expert mode's options
"min SDK" and "target SDK" by the way).
A pache
Ant
is a compilation-tool that allows App Builder to automate the
building to APK and avoids using the huge and heavy development
environment that is Eclipse.
Download
the latest version from the official website, then we recommend you
unzip it directly in the folder
where you installed App Builder,
this
way clicking App Builder's autodetect button (![]() )
will automatically find Ant
on your system.
)
will automatically find Ant
on your system.
F inally
a keystore
+ its user name (aka Alias)
and Password
are needed to allow other Android devices to install your APK through
the Google Play store (or other stores).
If
you don't have any keystore, you can create one with the long button
"Create a new keystore" and then follow the instructions
that are given to you. If you already have a keystore, click "Browse"
to select it and fill its Alias/Password fields when asked for (or
you can change them through the "Configuration" button (![]() )
of the Keystore
section.
)
of the Keystore
section.
Q: App Builder goes all the way but then build fails. The log says "Error: No resource found that matches the given name: attr 'android:textCursorDrawable'" or it also says "The following error occurred while executing this line: null returned: 1"
A: You are using an Android target API which is too low for compiling a BASIC! project. Run App Builder’s Guide then open SDK Manager and install at least Android 4.0 (API 14) or even greater: Android 4.1.2 (API 16) or Android 4.2.2 (API 17), then select said API in App Builder’s "Android API chosen for compilation" drop list and click the "Change API" button.
Q: Does the /source project folder need to contain only 1 ".bas" file?
A: If your program is contained in more than 1 ".bas" files i.e. you make use of the INCLUDE statement, then /source project folder needs to contain all the ".bas" files: main one and include files. Else, only main .bas file is ok.
Q: All my APK files look the same in Windows. Is there a way I can see their icons, like on my Android device?
A: There is a great little tool for that: it can be downloaded at http://code.google.com/p/apkshellext/

More
to come! Please propose your questions
at http://rfobasic.freeforums.org/questions-and-comments-f23.html